Sunday, May 29, 2011

Patience

Something I have very little of.
As I embarked upon this extremely long crafting journey, my patience was tested more than ever before.

I had to cut, glue, iron, stitch, and aline little pieces of fabric for 6 hours.

I enjoyed myself somewhat, but am very satisfied with the outcome of my project.

I was sick of fixing or making clothes, so I decided to do something different this time around.
I searched through some of my favorite craft blogs and found THIS golden idea.

I love American history, but mostly I just love this country. That is why I chose this project.
I used my moms endless supply of scraps to construct this map of America.
Though it took a lot longer than I expected, I love the outcome and can't wait to hang it in my room when I move back to Provo.


Go America. 

-Rachel 

Tuesday, May 24, 2011

photo blocks

Oh my, I am so proud of Rachel, she does enough projects for the 2 of us!  I have had a crazy past week (or two, it looks like) and a stressful week called for an eaaaaasy project.  This one is one of the top projects in my book, and I love pulling it out for friends' birthdays.  This was for Chelsea's birthday, which was yesterday (happy birthday my dear friend!!) and yes, I just barely shipped it off yesterday (which is also why I couldn't post it till now, even though they were done last week....because Chelsea is probably one of the only people who reads our blog and would see this not-a-surprise-anymore. We should be safe, the package is scheduled to get there tomorrow.)  SO ENJOY THIS EASY CRAFT, YOU PUNKS.  I'm planning on some coasters (sewing project), U.S.A. wall map Rachel found (also sewing project), and perhaps some headbands, belts and bracelets to keep you blog readers entertained.  Do friendship bracelets count as projects?  If so, I'm on my 5th in the past week....

How to: Fool everyone and make the easiest craft ever which can actually be a very cute dorm desk decoration, or perhaps a nice topic of conversation to have in your apartment living room.
Materials: ha, paint, paintbrushes, 3 2x2 wood blocks (or more!), sandpaper, mod podge, lotssssa pictures
Step 1: Sand the corners and edges of the blocks, see the difference between the left and right one? 
Step 2: Paint dem blocks, only 1 coat needed, most of the surface area will be covered with pictures anyways.
Step 3: Print the pictures! 18 total, do the math. To fit on 2x2 I simply format them in Word to 1.75". 
Step 4: Cut them out...............
Step 5: Mod podge them on! I do a thin layer before I add the pictures, then add some on top as a glaze.
Done! Stack, play, turn, twist, rearrange.....

So long, farewell, auf wiedersehen, goodnight........love, em

Friday, May 20, 2011

Skirt into bag--dress into skirt

I found a small skirt in the D.I. bin in my building before I came home. I liked the print, and thought I could do something with it. I cut around the edges to give it a little shape, and used leftover fabric from the top to add a strap. I then added a clip-on flower I made a while ago to match the flowers on the bag.

I now have a cute bojo sling to carry around this summer. Oh, and please excuse the awkwardness of this picture. The bag looks kinda frumpy in this one--but it isn't in real life. hah.


I also went through my closet and grabbed two dresses I've had for a couple of years. I don't wear them because they both fit weird. I once again, cut off the tops and made some skirts. 

Before

before


2 more skirts to add to my wardrobe. I have way too many now and probably wont be making any more for a while. Ha. 

I also started working on a different project today and I cant wait to share it with you. Happy summer!
-Rach

Tuesday, May 17, 2011

Bows!

Emilee came across this skirt in a craft blog during winter semester.

When she showed me, I mentally put it on my list of things I wanted to make this summer. The other day I started looking through my moms old patterns to find one to start this pencil skirt. She had thrown the one I was looking for away, so I decided to make my own pattern instead. 

Youtube offers a plethora of how-to's for skirts, shirts, dresses, etc. I found one that showed me how to make a pattern for a pencil skirt and I was on my way. I used the back of old Christmas wrapping paper for the pattern: 

After I made the pattern (only took around 20 minutes), I found some cool purple denim that I thought would work well. The fabric ended up being cheap and didn't hold my seams. SO. I was forced to resort to plan B. 

Plan B: 

1. Find fanned green skirt at thrift store for $1 
2. Cut off 6 inches from the bottom
3. Hem up an inch
4. Make bow from the fabric I cut off
5. Glue on bow to skirt with fabric glue my mom got for Christmas

I finally got my bow skirt (which I kinda love). 


P.S. Since I've been home I have not touched pants, capris, or shorts. Summer skirts and me love each other. ha. 

P.S.S. I am still going to do something with that darn purple skirt. I think. 

Happy Happy Summer days!
-Rachel 


Friday, May 13, 2011

drumroll please

I don't sew....as in I don't sew.  Like, the extent of my capabilities are 2 skirts (made with someone watching me the whole time), some grosgrain ribbon belts, and a girls camp ward flag (okay this one was quilted--I am pretty proud of it.  I still have it.)  And years ago I made my Barbies some pretty great sleeping bags and pillows.  But other than that, I prefer making.....other things.  But yesterday I was trying to find something to wear with this dress:


And I realized it kinda looked childish with whatever I tried to wear it with.  (Btw, $4 find at the thrift store.  Maybe that's why I thought I could chop it up.)   So I pulled out this shirt:


And okay, this shirt was nicer but I haven't worn it in forever.  (Do you see where this is going?)  So I real quick skyped Rachel, the sewing master, and asked her if SHE would do what I was about to do, make the dress into a skirt then attach it to the shirt to make it a dress again.  After I got the okay-go from her, I felt a little more confident.  I chopped off the top part of the dress below the empire-waist line, pinned it to the dress, and sewed it around the shirt.  The planets were aligned and the gods were with me, because SOMEHOW the side seams of both the dress and the shirt matched up EXACTLY, as in they were the exact same measurement around, and I didn't have to take any of it in.  Basically this is what it turned out as:


I decided to keep the dress line where I cut it, instead of making an inside seam where the dress was attached, because I liked the small line of pattern from the dress that was unintentionally there from when I cut the dress.


And here's me wearing it, looking my best.  And that's how you sew a dress to a shirt, thanks to Rachel for inspiring me.  Honestly, if I could do it, anyone could.


Also, coming up next: photo blocks.  I'm halfway through this project because I didn't know we were out of modge podge, but I'm going to get some tonight.  That's all.

-Emilee

Tuesday, May 10, 2011

From dress to skirt

Meet Berkley. 
My best friend, and also the only girl willing to let me take all of her old dresses, rip/cut them up, and then let me take pictures of her in them. 

Every single one of these skirts used to be a dress. She was going to donate them to the D.I. because they were too short for her now. One I protested, I was able to convince her otherwise. 

They were all very simply to alter. Cut off the top part of the dress, add an elastic band, hem it over. Done. 
I only have before pictures for two of them, but they all were actually dresses at one point. 

I made the headband she's wearing in this one as well, and the shoes are my moms from when she was in college. 


This one was the easiest. Seriously, all I did was cut off the top part of the dress. The bow in the back is my favorite part. I also made the headband in this picture. 


 This one was a little bit harder, but I was able to add an elastic ban to make it fit around the waist. The shirt she is wearing I got in the 6th grade! Again, I made the headband in this photo and bought the shoes from the D.I. for a dollar. 

This skirt used to be a shirt/dress that I also actually own. I just cut off the straps and hemmed the top. I never wear the shirt in this picture because it doesn't look good on me. I'm glad I could find someone to have it look good on. Once again (ha) I made the headband and bought the blue velvet shoes from the D.I. for $2. 


This bow shirt is my favorite, but it never goes with anything! We finally got a skirt to go with it. The same thing with this one, all we did was cut off the top. 


Berk is wearing my favorite vest in this picture, and I love it combined with this wrap skirt. The tied bow in the front is my favorite part. 


That's 6 skirts she was going to give away! I'm glad I could fix them for her, and had a good time doing it. Seriously, go look in your closet--I swear you'll find one dress that you never wear that can easily be made into a cute summer skirt. 

<3 
Rachel 

Friday, May 6, 2011

The best store on this planet

Two golden words in my book: Deseret Industries

The D.I. is any poor college student's(living inside Utah) consignment haven. I shopped at two places my freshmen year: Forver 21 & The D.I.

When I realized I didn't even have enough money for Forever 21, I converted(almost entirely) to the D.I.

Near the end of the year all the girls in my building started going through their clothes and getting rid of what they no longer wanted in their closet.

A couple days before I came home I found a dress in the D.I. bin that some girl must have finally decided she didn't want.

I liked it for the pattern, and thought that I might be able to do something with it. Before I started on the project I showed my dad.

Me: "Dad, look at this dress I found in our D.I. bin, do you like it"
Dad: "Well, Rachel, I don't know. Is that what is in style these days?"
Me: "Not really, I'm going to fix it though".
Dad: (questionable voice)  "good luck"

I think I understand where he is coming from as I look back on what it looked like in the beginning...
I guarantee your mom owned a dress like this one in the 80s. My mom surely did. 

I started fixing it with the intent to keep it as a dress. I cut of 4 inches in width of fabric from the bottom half, and took in nearly 5 inches on the sleeves. When I finished (or thought I'd finished), I wasn't satisfied. It definitely didn't look as good as I'd hoped. 

As I was looking over it an hour ago, I finally came to the conclusion that I was going to just make it into a skirt. All I did was cut off the top of the cinched part and voila (Emilee)--summer skirt. 

Most importantly--summer skirt FOR FREE! 
Thank goodness for the D.I., and people that give stuff to that place. 

please excuse the poor photo quality. No one was home to take a photo, so I had to go with my mac. mazel tov. 


Tuesday, May 3, 2011

Organized Chaos. Rachel-Craft #1

With most of the things I fix or make this summer, I'll be using supplies I already have. My mom goes garage selling nearly every Saturday Morning and picks up odds and ends at them. She's made quite the collection over the years, and the culprit of her shopping is my favorite room in the house:


Our craft room is stalked with bins of fabric, cupboards of old scraps, bags of lace, boxes of buttons, and every tool anyone would need to construct a craft. I love this room.


I've grown up taking sewing lessons, and learning from my mom. My focus has mainly been quilting (I love it), but I also love to sew/craft any other random thing(thus why we started this blog).

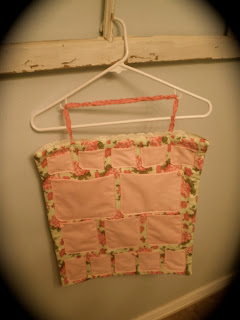
I just moved back home for the summer and found myself with a significantly less amount of jewelry than from when I left for college. This is all due to my jewelry bin being really disorganized and jumbled. I lose things when I don't have a place for them! While on vacation in Los Alamos, New Mexico last week, I noticed my friend Summer's Jewelry holder. She had it hanging in her closet and that's where I got the idea for my first summer project.

(all the jewelry)

I used a 1/2 yard of old scrap fabric my mom had for the backing. The pink I used for the pockets was also found in one of her old scrap bins. I attached some garage sale lace at the top, braided some pink ribbon together for the strap, and picked out 3 little rose buttons that I found in our button bin. It took me around 3 hours to make total.


Before I put my jewelry in


Finished product! 


It's really pink. I'm not that into pink, but I figured I needed something girly if It's holding my jewelry.

Tomorrow I'm going to start working on a dress I took out of my dorm buildings D.I. bin. It's about 6 sizes too big right now, it'll be interesting to see if I can make it work. Until then,

hope you're all having a happy summer, I sure am!
-Rach

Craft #1 - Spicin up the wallet

I flew home from St. George yesterday, and got into Maryland at 6 AM this fine morning!  While I was there with Rachel we wanted to make a craft together to kickstart the blog but we were too tired whenever we tried to start.  SO. 


Welcome to "the craft room." This is where I'll be spending my time making things this summer.


I already have a series of errands to run tomorrow, after I start my first day nannying, along with lunch with Dad and pedicure with Mom.  SO I knew I'd be taking my wallet around everywhere. I got this wallet for $2 at the DI in Provo with the idea that I was going to re-make it.  With the knowledge I'd be using it all day tomorrow since I already use it as a wallet, I decided this would be the first "craft" of the summer!


I reacquainted myself with my lovely ribbon box...and picked out a few favorites


Here was option 1.


Here was option 2


And I finally settled with option 3.  It's all made and done!  I simply ironed the ribbon, ironed it at the seam, hemmed the seams and ends of the bows (I don't like the job I did at all, it was super hasty but it'll keep it from fraying for now) and hot glue gunned it all down!  I was going to use some fabric glue but the glue gun worked just as well and didn't seep through the ribbon. VOILA!

-Emilee